DSLR Photo Tips for Every Staff Member

understanding-iso-100

Every staff member needs to know the basics of photography, just in case a spur-of-the-moment shoot happens. You need to be able to pick up a DSLR and change some settings to get a good shot. Here are some tips on how to be a well-rounded photographer.

When you are shooting, think about the ISO. ISO stands for International Organization of Standardization. This may be a little confusing if you are not familiar with the camera. Basically, the ISO is the setting to determine how much light is allowed into the camera. The ISO can be thought of as the old-fashioned “film speed” from the past. The more light the environment is, the lower the ISO needs to be. Let’s look at the following comparisons for suggestions on ISO in a certain setting!

ISO 100 or 200               Outside, a fair amount of sunshine

ISO 400                              Inside candid situations

ISO 800                              Inside sporting events (gym has

updated lighting)

ISO 1600 or 3200          Inside sporting event in an old

gym, outside sporting event at night

The next step to taking better pictures is to try something different. It is boring if you take all of your pictures at eye level and of the same event. Try to mix it up a little, and try different points of view Stand on a ladder or sit on the ground get the picture. The angle of the picture can make the viewers look at events differently. Plus, if there are more interesting pictures, the spread will have a more unique appeal to the viewer. Photos grab the readers’ attention and they will want to read the body copy that accompanies those interesting images.

Always remember where you are. If you are at a big event like a pep rally or a major game, send multiple photographers. You want to capture a lot of different emotions and events that are going on and it is hard if there is just one photographer. If there are a couple of photographers, one person could be on the sideline shooting the game, while one is in the stands with the fans. You always need to be aware of where you are and what is going on around you. Try to capture the emotion and energy in the image.

Equipment is a major thing. Without the right equipment, you will not be able to capture the moment the way you want. There isn’t one particular lens a staff should absolutely purchase, but an adviser should do some research before buying equipment. Talking with Lindsey, Danielle, Jenny, or Katie is a great start for a major purchase like this! We want to make sure you purchase a good camera and lens that will provide for a wide range of uses.

As a photographer, you should try to avoid flash. Let’s say that again! PHOTOGRAPHERS SHOULD AVOID THE FLASH LIKE IT IS THE PLAGUE! Not only does it wash a lot of color out of the picture, but it is also not allowed in a lot of places—such as volleyball games. Train yourself to use the settings on the camera instead of using the flash. This is another reason why getting to know how to use ISO is so important. Flash is very distracting, creates harsh lighting situations, and in general, doesn’t produce the best image.

The main thing to keep in mind is to just shoot. Do not constantly keep looking at what you just shot. You might be distracted from something really important. Shoot now, edit later. You will be a lot happier with the results. If you are not happy with photos you have shot when you do sit down and look at them, keep in mind what didn’t work well when shooting, and then improve on your shooting technique. This will help you grow as a student photographer.

Not everyone on the staff has to be a “professional” photographer or know how to use all of the buttons on the camera. These six tips should help you though. And if all else fails, just shoot. That’s all you can do. More than likely, you will end up with pictures that you like.

Apertures (Part 2)

Last week we left you on a cliffhanger note about apertures (which I do apologize for). Part of the reason for that was not to overload any readers (because I know that when a bunch of new information is thrown at me, I tend to have a mini heart attack). The other reason was that it provided for a nice break to give you some time to get the hang of the different f-stops.

If you did happen to miss last week’s blog, this one will still make sense. However, if you like to do things in order, you can check out Apertures (Part 1).

The other way that aperture can effect your photographs is by changing the depth of field. Now, what’s that? Depth of field is the range of distance that appears to be perfectly sharp in your photograph.

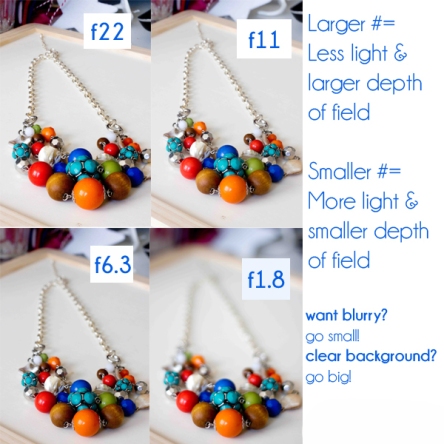
As you can see from the photograph below, smaller f stops result in a shallow depth of field. This means that the foreground is crisp and the background is slightly blurry. (For the example below you’ll have to look between the gray button and the green button to see the difference.)

Larger f stops, such as f/ 22, result in greater depth of field. This means that everything in your photograph is going to be crisp. If you want a comparison to the first picture, look no further.

Now, you may be thinking to yourself “Well, that’s creative and helpful, but I’m not looking for artsy photographs for my yearbook. What happens if I just want to shoot normally?”

The simple answer to that question would be that changing from one f stop to the next will not be as dramatic as the two pictures in this blog. If you tend to stay in the middle and towards the higher numbered f stops, you’ll be fine. (Note: doing this means you’ll have to compensate by changing the shutter speed and/or the ISO.)

Think you’re ready to see how much we’ve covered the past two weeks? Check out the picture below. Hopefully you’ll be able to see that it’s only when you make large jumps between f-stops that you get the dramatic changes in background.

Helpful hint: If you do decide to get creative with shallow depth of field, the subject in focus does not always have to be in the foreground.

Apertures (Part 1)

In last week’s blog, (ISO is …?), we explained how to manipulate your camera into thinking you have more light than you actually do. However, if you choose to continue shooting on manual, there’s actually more than one way to do this (and all three ways can work together…but I’m getting ahead of myself).

The second way you can fool your camera is to change your aperture, which is also known as “f-stops.”

When you change the aperture it can have two different effects on your photograph. The first is that it can change the amount of light that enters your lens (making your photograph lighter or darker depending on which way you move on the dial).

Note: Changing the size of your aperture is a little confusing for some, and extremely confusing for most (so hopefully some visual aids will help alleviate the chaos and confusion).

Basically, if you want to let more light into your lens you’ll want a bigger opening. Letting more light in your camera will make your photograph insanely bright (assuming you haven’t changed any other settings, which we’ll get to in a few blogs). The biggest opening in a standard camera is f/1.4. Confusion comes into play because most people assume that smaller numbers means smaller holes….you have to fight that urge and once you do it’ll become second nature.

It’s the exact opposite if you want to make your photograph darker. You would switch your aperture to f/22. This would let in the amount of light equivalent to an eraser tip.

If none of this is making any sense yet, here’s that visual aid I promised you at the beginning of the blog.

Hopefully that clears the clouds a little bit. Still wondering about the second thing that happens when you change F stops? Stay tuned for next week’s blog and if you have any topics you’d like covered, just shoot us an email.