Welcome back to our blog!
This week’s topic is going to cover a few tips for shooting any event for your yearbook. Remember, you can never have too many pictures because it’s better to have shot than to have passed up an opportunity. Let’s start, shall we?
Tip 1: Photograph Before the Event
A lot of high school students sitting in their yearbook classes or staying after school to work on the yearbook tend to just go to an event like a basketball game and shoot only the game. Now, there’s nothing wrong with this, but in order to improve the quality your yearbooks you should consider widening your horizons.
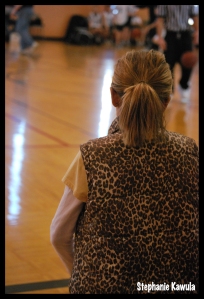
Shooting the little events, facial expressions, and preparation before the event (or game in this case) really give viewers a sense of setting and provide a great introduction to the main event.
An example of this type of photograph was shot by one of our interns. Although the little girl in the foreground isn’t doing any major action, the shallow depth of field allows the viewer to see that the referees are getting ready for the game.
Tip 2: Photograph During the Event
Of course the whole reason you’re going to the event is so you can record the memories. As mentioned before, you can never have too many pictures. (The negative side is that after you’re doing shooting, you have to go through all of the pictures and determine which ones are good enough to show your yearbook editor.)
Timing is everything when at an event. This can be a difficult concept, especially if you don’t know how your camera works or if the lighting situation isn’t ideal. A useful sub-tip (if you will) would be to shoot with your camera on manual and to look through the viewfinder (that’s that little square in your camera that hardly anyone has used since the digital age). Looking through this viewfinder forces you to move your camera with the action. Couple this with having your index finger on the shutter release button and you’ll capture more difficult shots with a little more ease and a lot less frustration.
P.S.- Don’t just shoot one side of the story. Remember, it takes two teams to play a game so you should capture that in your photographs.
Tip 3: Shoot After the Event
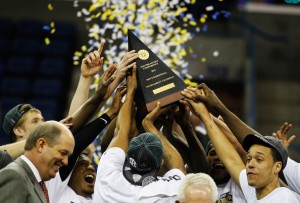
As with shooting before the event, most high school photographers don’t “finish the story.” Did the team win? Did they lose? What emotions are on their faces?
Since by this time you might not have that much space left on your memory card, it’s a good idea to think ahead and pack two. Remember, it’s better to be safe than to be sorry.

The Vanderbilt Commodores celebrate with the trophy after their 71 to 64 win over the Kentucky Wildcats in the championship game of the 2012 SEC Men’s Basketball Tournament at New Orleans Arena on March 11, 2012 in New Orleans, Louisiana.
Tip 4: Shoot the Crowd
Another tip that will help you tell a more complete story with your pictures will be to shoot the crowd (in a photographic sense of course). Just because you’re there to shoot the game does not mean that you’re limited to the game. Feel free to do a 360° turn to enhance what you have. Sometimes the crowd can convey that one emotion that sums up the whole experience of being at that place, at that specific time.
Keep reading for more updates and if you have any topics you’d like to see expanded on, don’t hesitate to speak up. We’re all about serving you!

